
Reeses Peanut Butter Cup Pie, oh my! Just the name alone conjures up images of creamy, dreamy, peanut butter and chocolate bliss, doesn’t it? Imagine sinking your fork into a slice of pure indulgence, where the rich, decadent flavors of Reese’s Peanut Butter Cups explode on your palate. This isn’t just a pie; it’s an experience, a celebration of two of the world’s most beloved flavors perfectly harmonized in a single dessert.
While the exact origins of the Reeses Peanut Butter Cup Pie are shrouded in delicious mystery (likely born from a home baker’s brilliant inspiration!), the combination of peanut butter and chocolate has a long and cherished history. From simple candies to elaborate desserts, this pairing has captivated taste buds for generations. Its a classic American flavor profile that evokes feelings of nostalgia and pure comfort.
But what is it about this pie that makes it so irresistible? It’s the perfect balance of textures the smooth, creamy peanut butter filling against the crisp, chocolatey crust. It’s the intense, satisfying flavor that’s both sweet and salty, rich and comforting. And let’s be honest, it’s also incredibly easy to make! This no-bake wonder is perfect for potlucks, parties, or simply a well-deserved treat after a long day. Get ready to experience peanut butter and chocolate heaven!

Ingredients:
- For the Crust:
- 1 ½ cups chocolate wafer crumbs (about 36 wafers)
- 5 tablespoons unsalted butter, melted
- ¼ cup granulated sugar
- For the Peanut Butter Filling:
- 8 ounces cream cheese, softened
- 1 cup creamy peanut butter
- 1 cup powdered sugar
- ½ cup heavy cream
- 1 teaspoon vanilla extract
- ¼ teaspoon salt
- For the Chocolate Ganache Topping:
- 8 ounces semi-sweet chocolate, chopped
- ½ cup heavy cream
- 1 tablespoon unsalted butter
- For Garnish (Optional):
- Reese’s Peanut Butter Cups, halved or quartered
- Mini chocolate chips
- Peanut butter drizzle
Preparing the Chocolate Wafer Crust:
- Crush the Chocolate Wafers: The first step is to transform those chocolate wafers into fine crumbs. You can use a food processor for this, pulsing until you achieve a sand-like consistency. Alternatively, place the wafers in a large zip-top bag, seal it tightly, and use a rolling pin to crush them. Make sure there aren’t any large chunks remaining. A uniform crumb is key for a sturdy crust.
- Combine the Crumbs with Butter and Sugar: In a medium bowl, combine the chocolate wafer crumbs, melted butter, and granulated sugar. Mix well until all the crumbs are evenly moistened. The mixture should resemble wet sand and hold its shape when pressed together. This is what will give your crust its structure.
- Press the Crust into the Pie Plate: Transfer the crumb mixture to a 9-inch pie plate. Use the bottom of a measuring cup or your fingers to firmly press the crumbs evenly across the bottom and up the sides of the pie plate. Make sure the crust is compact and consistent in thickness. This will prevent it from crumbling when you slice the pie.
- Pre-bake the Crust (Optional): For a sturdier crust, you can pre-bake it. Preheat your oven to 350°F (175°C). Bake the crust for 8-10 minutes. This will help it set and prevent it from becoming soggy when you add the filling. Let the crust cool completely before adding the peanut butter filling. If you skip this step, just make sure to chill the crust well before adding the filling.
- Chill the Crust: Whether you pre-baked it or not, chilling the crust is crucial. Place the prepared crust in the refrigerator for at least 30 minutes, or even better, an hour. This allows the butter to solidify, creating a firm base for the filling.
Making the Peanut Butter Filling:
- Cream the Cream Cheese and Peanut Butter: In a large bowl, using an electric mixer (either a stand mixer or a hand mixer), beat the softened cream cheese until it’s smooth and creamy. Add the peanut butter and continue to beat until the mixture is well combined and there are no lumps. Make sure your cream cheese is truly softened; otherwise, you’ll end up with a lumpy filling.
- Add the Powdered Sugar: Gradually add the powdered sugar to the cream cheese and peanut butter mixture, beating on low speed until it’s fully incorporated. Be careful not to add the powdered sugar all at once, as it can create a cloud of dust. Scrape down the sides of the bowl as needed to ensure everything is evenly mixed.
- Incorporate the Heavy Cream, Vanilla, and Salt: Pour in the heavy cream, vanilla extract, and salt. Beat on medium speed until the filling is light and fluffy. The heavy cream will help to lighten the texture of the filling and make it incredibly smooth. The vanilla extract enhances the flavor, and the salt balances the sweetness.
- Taste and Adjust: Give the filling a taste and adjust the sweetness or saltiness to your liking. If you prefer a sweeter filling, add a little more powdered sugar. If you want a more pronounced peanut butter flavor, add a touch more peanut butter.
- Pour the Filling into the Crust: Remove the chilled chocolate wafer crust from the refrigerator. Pour the peanut butter filling into the crust, spreading it evenly with a spatula. Make sure the filling reaches all the way to the edges of the crust.
- Chill the Filled Pie: Cover the pie with plastic wrap, pressing it gently onto the surface of the filling to prevent a skin from forming. Refrigerate the pie for at least 4 hours, or preferably overnight, to allow the filling to set completely. This is a crucial step for achieving the perfect slice.
Preparing the Chocolate Ganache Topping:
- Chop the Chocolate: Finely chop the semi-sweet chocolate and place it in a heatproof bowl. Using finely chopped chocolate ensures that it melts evenly and smoothly.
- Heat the Heavy Cream: In a small saucepan, heat the heavy cream over medium heat until it just begins to simmer. Do not let it boil. Watch it carefully, as it can quickly overflow.
- Pour the Hot Cream over the Chocolate: Pour the hot heavy cream over the chopped chocolate. Let it sit for about a minute to allow the heat to melt the chocolate.
- Stir Until Smooth: Gently stir the chocolate and cream together, starting from the center and working your way outwards. Continue stirring until the chocolate is completely melted and the ganache is smooth and glossy. If there are any stubborn pieces of chocolate that won’t melt, you can microwave the mixture in 15-second intervals, stirring in between, until it’s completely smooth.
- Add the Butter: Stir in the unsalted butter until it’s fully incorporated and the ganache is even more glossy and rich. The butter adds a luxurious sheen and enhances the flavor of the ganache.
- Let the Ganache Cool Slightly: Allow the ganache to cool slightly for about 10-15 minutes before pouring it over the pie. This will prevent it from melting the peanut butter filling. The ganache should be thick enough to spread easily but not so thick that it’s difficult to work with.
Assembling and Garnishing the Pie:
- Pour the Ganache over the Filling: Remove the chilled pie from the refrigerator. Pour the slightly cooled chocolate ganache over the peanut butter filling, spreading it evenly with a spatula. Make sure the ganache covers the entire surface of the filling.
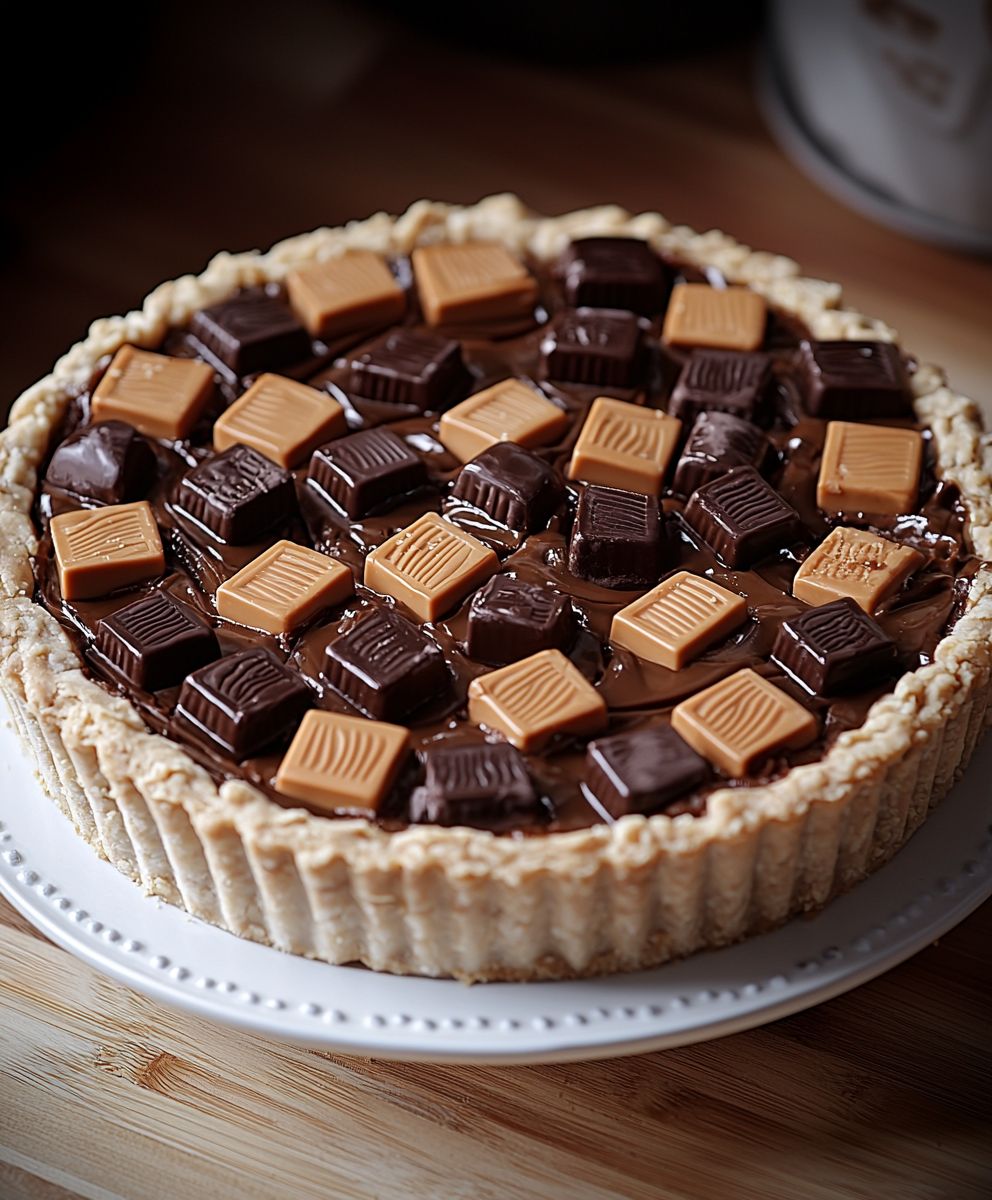
- Garnish the Pie (Optional): While the ganache is still slightly soft, garnish the pie with Reese’s Peanut Butter Cups (halved or quartered), mini chocolate chips, and a peanut butter drizzle. Get creative with your decorations! You can arrange the peanut butter cups in a circular pattern, sprinkle the mini chocolate chips evenly over the surface, and drizzle the peanut butter in a zig-zag pattern.
- Chill the Pie Again: Return the pie to the refrigerator and chill for at least 30 minutes to allow the ganache to set completely. This will make it easier to slice and serve.
- Slice and Serve: Once the pie is thoroughly chilled, it’s ready to slice and serve. Use a sharp knife to cut clean slices. You can serve the pie cold or let it sit at room temperature for a few minutes before serving for a slightly softer texture.
- Enjoy! This Reese’s Peanut Butter Cup Pie is a decadent and irresistible treat that’s perfect for any occasion. Enjoy every bite!
Conclusion:
This Reese’s Peanut Butter Cup Pie isn’t just a dessert; it’s an experience. It’s the kind of pie that makes you close your eyes and savor every single bite, a symphony of creamy peanut butter and rich chocolate that will leave you craving more. If you’re a peanut butter lover (and let’s be honest, who isn’t?), then this recipe is an absolute must-try. The combination of the crumbly chocolate crust, the smooth peanut butter filling, and the decadent chocolate ganache is simply irresistible. Its a guaranteed crowd-pleaser, perfect for holidays, birthdays, or even just a special weeknight treat. But what truly sets this pie apart is its simplicity. Despite its impressive presentation and incredible flavor, it’s surprisingly easy to make. You don’t need to be a professional baker to whip up this masterpiece. The steps are straightforward, the ingredients are readily available, and the result is a pie that tastes like it came straight from a gourmet bakery. Trust me, you’ll be amazed at how simple it is to create something so delicious. Looking for serving suggestions? A dollop of whipped cream or a scoop of vanilla ice cream complements the richness of the pie beautifully. For an extra touch of elegance, sprinkle some chopped Reese’s Peanut Butter Cups on top. If you’re feeling adventurous, try drizzling some salted caramel sauce over each slice. The saltiness will enhance the sweetness of the peanut butter and chocolate, creating an even more complex and satisfying flavor profile. And speaking of variations, the possibilities are endless! You could add a layer of chopped peanuts to the filling for extra crunch. Or, for a more intense chocolate flavor, use dark chocolate for the ganache. If you’re a fan of white chocolate, try substituting it for the milk chocolate in the ganache. Another fun variation is to swirl some peanut butter into the chocolate ganache for a marbled effect. Get creative and experiment with different flavors and textures to create your own signature version of this amazing pie. I truly believe that everyone should have this Reese’s Peanut Butter Cup Pie recipe in their repertoire. It’s a guaranteed winner that will impress your friends and family and satisfy your sweet tooth. It’s the perfect dessert to bring to a potluck, a holiday gathering, or any occasion where you want to share something special. So, what are you waiting for? Gather your ingredients, preheat your oven, and get ready to embark on a peanut butter and chocolate adventure. I’m confident that you’ll love this recipe as much as I do. I can’t wait to hear about your experience making this pie! Please, don’t hesitate to share your photos, comments, and variations in the comments section below. Let me know what you think, what you changed, and how much everyone enjoyed it. Your feedback is invaluable, and I love seeing how you make this recipe your own. Happy baking! Print
Reeses Peanut Butter Cup Pie: The Ultimate Dessert Recipe
- Total Time: 278 minutes
- Yield: 8 servings 1x
Description
Decadent Reese’s Peanut Butter Cup Pie with a chocolate wafer crust, creamy peanut butter filling, and rich chocolate ganache topping. A peanut butter lover’s dream!
Ingredients
- 1 ½ cups chocolate wafer crumbs (about 36 wafers)
- 5 tablespoons unsalted butter, melted
- ¼ cup granulated sugar
- 8 ounces cream cheese, softened
- 1 cup creamy peanut butter
- 1 cup powdered sugar
- ½ cup heavy cream
- 1 teaspoon vanilla extract
- ¼ teaspoon salt
- 8 ounces semi-sweet chocolate, chopped
- ½ cup heavy cream
- 1 tablespoon unsalted butter
- Reese’s Peanut Butter Cups, halved or quartered
- Mini chocolate chips
- Peanut butter drizzle
Instructions
- Crush the Chocolate Wafers: Use a food processor or a rolling pin to crush the chocolate wafers into fine crumbs.
- Combine the Crumbs with Butter and Sugar: In a medium bowl, combine the chocolate wafer crumbs, melted butter, and granulated sugar. Mix well until evenly moistened.
- Press the Crust into the Pie Plate: Transfer the crumb mixture to a 9-inch pie plate. Press firmly and evenly across the bottom and up the sides.
- Pre-bake the Crust (Optional): Preheat oven to 350°F (175°C). Bake the crust for 8-10 minutes. Let cool completely.
- Chill the Crust: Place the prepared crust in the refrigerator for at least 30 minutes (or an hour).
- Cream the Cream Cheese and Peanut Butter: In a large bowl, beat the softened cream cheese until smooth. Add the peanut butter and beat until well combined.
- Add the Powdered Sugar: Gradually add the powdered sugar, beating on low speed until fully incorporated.
- Incorporate the Heavy Cream, Vanilla, and Salt: Pour in the heavy cream, vanilla extract, and salt. Beat on medium speed until light and fluffy.
- Taste and Adjust: Adjust the sweetness or saltiness to your liking.
- Pour the Filling into the Crust: Remove the chilled crust from the refrigerator. Pour the peanut butter filling into the crust, spreading it evenly.
- Chill the Filled Pie: Cover with plastic wrap and refrigerate for at least 4 hours (or overnight).
- Chop the Chocolate: Finely chop the semi-sweet chocolate and place it in a heatproof bowl.
- Heat the Heavy Cream: In a small saucepan, heat the heavy cream over medium heat until it just begins to simmer.
- Pour the Hot Cream over the Chocolate: Pour the hot heavy cream over the chopped chocolate. Let it sit for about a minute.
- Stir Until Smooth: Gently stir until the chocolate is completely melted and the ganache is smooth and glossy.
- Add the Butter: Stir in the unsalted butter until fully incorporated.
- Let the Ganache Cool Slightly: Allow the ganache to cool slightly for about 10-15 minutes.
- Pour the Ganache over the Filling: Remove the chilled pie from the refrigerator. Pour the slightly cooled chocolate ganache over the peanut butter filling, spreading it evenly.
- Garnish the Pie (Optional): While the ganache is still slightly soft, garnish with Reese’s Peanut Butter Cups, mini chocolate chips, and a peanut butter drizzle.
- Chill the Pie Again: Return the pie to the refrigerator and chill for at least 30 minutes.
- Slice and Serve: Slice and serve cold or at room temperature.
Notes
- For a sturdier crust, pre-bake it.
- Make sure the cream cheese is softened to avoid a lumpy filling.
- Chill the pie thoroughly for the best results.
- Adjust the sweetness and saltiness of the filling to your preference.
- Let the ganache cool slightly before pouring it over the filling to prevent melting.
- Get creative with your garnishes!
- Prep Time: 30 minutes
- Cook Time: 8 minutes

Leave a Comment