
Slush Cosmo cocktail: the very words conjure images of sun-drenched patios, laughter with friends, and the delightful tingle of a perfectly balanced, icy-cold drink. Forget everything you thought you knew about Cosmopolitans this isn’t your average, shaken-not-stirred affair. We’re taking this classic cocktail and giving it a frosty, fun, and utterly irresistible makeover!
The Cosmopolitan, famously popularized by “Sex and the City,” has always been synonymous with chic sophistication. But its roots actually trace back further, with variations appearing throughout the 20th century. This vibrant pink drink, traditionally a blend of vodka, cranberry juice, Cointreau, and lime, quickly became a symbol of modern femininity and urban glamour. But why limit ourselves to tradition when we can elevate it?
What makes the Slush Cosmo cocktail so incredibly appealing? It’s the perfect marriage of sweet, tart, and boozy, all wrapped up in a refreshing, icy package. The slushy texture adds an element of playful indulgence, making it ideal for warm weather gatherings, backyard barbecues, or simply unwinding after a long day. It’s incredibly easy to make, requiring minimal effort and readily available ingredients. Plus, who can resist that beautiful, vibrant pink hue? Get ready to impress your guests (and yourself!) with this delightful twist on a beloved classic.

Ingredients:
- 1 cup (2 sticks) unsalted butter, softened
- ¾ cup granulated sugar
- ½ teaspoon almond extract
- ¼ teaspoon vanilla extract
- 1 large egg
- 2 ¼ cups all-purpose flour
- ½ teaspoon baking powder
- ¼ teaspoon salt
- Optional: Food coloring (gel or liquid)
- Optional: Sprinkles, sanding sugar, or other decorations
Preparing the Dough:
- Cream the butter and sugar: In a large bowl, using an electric mixer (either a stand mixer or a hand mixer), cream together the softened butter and granulated sugar until light and fluffy. This usually takes about 3-5 minutes. Make sure to scrape down the sides of the bowl occasionally to ensure everything is evenly mixed. The mixture should be pale and airy. This step is crucial for achieving the right texture in your Spritz cookies.
- Add the extracts and egg: Beat in the almond extract and vanilla extract until well combined. Then, add the egg and continue to beat until the mixture is smooth and creamy. Again, scrape down the sides of the bowl to ensure everything is incorporated properly. The extracts provide the signature flavor of Spritz cookies, so don’t skimp on them!
- Combine dry ingredients: In a separate medium bowl, whisk together the all-purpose flour, baking powder, and salt. Whisking ensures that the baking powder and salt are evenly distributed throughout the flour, which is important for the cookies to rise properly and have a consistent flavor.
- Gradually add dry ingredients to wet ingredients: Gradually add the dry ingredients to the wet ingredients, mixing on low speed until just combined. Be careful not to overmix the dough, as this can result in tough cookies. Mix until the flour is just incorporated, and then stop. A slightly sticky dough is perfectly fine.
- Color the dough (optional): If you want to make colored Spritz cookies, divide the dough into separate bowls (one for each color you want to use). Add a few drops of food coloring (gel or liquid) to each bowl and mix until the color is evenly distributed. Start with a small amount of food coloring and add more until you achieve the desired shade. Remember that the color will deepen slightly during baking.
- Chill the dough: Wrap the dough (or each colored portion of dough) in plastic wrap and chill in the refrigerator for at least 1 hour, or preferably 2 hours. This chilling time is essential because it allows the butter to firm up, which will prevent the cookies from spreading too much during baking. It also makes the dough easier to handle and pipe. You can even chill the dough overnight if that’s more convenient.
Using a Cookie Press:
- Preheat the oven: Preheat your oven to 375°F (190°C). Make sure your oven rack is in the center position.
- Prepare baking sheets: Line baking sheets with parchment paper or silicone baking mats. This will prevent the cookies from sticking and make cleanup easier. Do not grease the baking sheets directly, as this can cause the cookies to spread too much.
- Load the cookie press: Remove the chilled dough from the refrigerator. If the dough is too firm to press easily, let it sit at room temperature for a few minutes to soften slightly. Load the dough into your cookie press, following the manufacturer’s instructions. Make sure the dough is packed tightly into the cylinder to avoid air pockets.
- Press the cookies: Hold the cookie press directly over the prepared baking sheet, with the nozzle touching the surface. Press the lever or button to release the dough onto the baking sheet. Lift the press straight up after each cookie to avoid smearing the design. Space the cookies about 1 inch apart on the baking sheet. If the dough is sticking to the press, try chilling it for a bit longer. If the dough is too soft, the cookies will lose their shape during baking.
- Decorate (optional): If desired, decorate the cookies with sprinkles, sanding sugar, or other decorations before baking. Gently press the decorations into the dough so they adhere properly.
- Bake the cookies: Bake for 6-8 minutes, or until the edges of the cookies are lightly golden brown. Keep a close eye on them, as they can burn easily. The baking time will vary depending on your oven and the size of the cookies.
- Cool the cookies: Remove the baking sheets from the oven and let the cookies cool on the baking sheets for a few minutes before transferring them to a wire rack to cool completely. This will prevent them from breaking.
- Repeat: Repeat the process with the remaining dough, re-chilling the dough if it becomes too soft to press easily.
Troubleshooting and Tips:
- Dough too dry: If your dough is too dry and crumbly, add a teaspoon of milk or water at a time until it reaches the desired consistency.
- Dough too soft: If your dough is too soft and sticky, add a tablespoon of flour at a time until it reaches the desired consistency. You may also need to chill the dough for a longer period of time.
- Cookies spreading too much: If your cookies are spreading too much during baking, make sure your butter is not too soft. Also, make sure you are not greasing the baking sheets. Chilling the dough for a longer period of time can also help.
- Cookies not releasing from the press: If your cookies are not releasing from the press, make sure the dough is packed tightly into the cylinder. You may also need to chill the dough for a bit longer.
- Cookie press not working: Make sure you are using the correct type of dough for your cookie press. Spritz cookie dough is typically a stiffer dough than other types of cookie dough. Also, make sure your cookie press is clean and in good working order.
- Storing Spritz Cookies: Store the cooled Spritz cookies in an airtight container at room temperature for up to a week. They can also be frozen for longer storage.
- Flavor Variations: Experiment with different extracts to create unique flavor combinations. Try lemon extract, orange extract, or peppermint extract. You can also add spices like cinnamon or nutmeg to the dough.
- Decorating Ideas: Get creative with your decorations! Use different colors of sprinkles, sanding sugar, or edible glitter. You can also drizzle the cookies with melted chocolate or royal icing.
- Making Ahead: The dough can be made ahead of time and stored in the refrigerator for up to 3 days. Just bring it to room temperature slightly before using.
- Freezing: Baked cookies can be frozen in an airtight container for up to 2 months. Thaw at room temperature before serving.
Achieving the Perfect Spritz Texture:
The texture of a Spritz cookie is key to its appeal. It should be delicate, slightly crumbly, and melt-in-your-mouth. Here are some tips to help you achieve the perfect texture:
- Don’t overmix the dough: Overmixing develops the gluten in the flour, which can result in tough cookies. Mix the dough until just combined.
- Use softened butter: Softened butter is essential for creating a light and airy dough. Make sure the butter is softened to room temperature, but not melted.
- Chill the dough: Chilling the dough allows the butter to firm up, which prevents the cookies from spreading too much during baking. It also makes the dough easier to handle and pipe.
- Bake at the right temperature: Baking at the right temperature is crucial for achieving the perfect texture. Bake the cookies at 375°F (190°C) until the edges are lightly golden brown.
- Don’t overbake the cookies: Overbaking will result in dry, crumbly cookies. Bake the cookies until they are just set and the edges are lightly golden brown.
Spritz Cookie Variations:
Once you’ve mastered the basic Spritz cookie recipe, you can experiment with different variations to create unique and delicious treats. Here are a few ideas:
- Chocolate Spritz Cookies: Add ¼ cup of unsweetened cocoa powder to the dry ingredients for chocolate Spritz cookies.
- Lemon Spritz Cookies: Add 1 tablespoon of lemon zest and 1 teaspoon of lemon extract to the wet ingredients for lemon Spritz cookies.
- Orange Spritz Cookies: Add 1 tablespoon of orange zest and 1 teaspoon of orange extract to the wet ingredients for orange Spritz cookies.
- Peppermint Spritz Cookies: Add ½ teaspoon of peppermint extract to the wet ingredients and crush some peppermint candies to sprinkle on top of the cookies before baking for peppermint Spritz cookies.
- Spice Spritz Cookies: Add ½ teaspoon of ground cinnamon, ¼ teaspoon of ground nutmeg, and ¼ teaspoon of ground cloves to the dry ingredients for spice Spritz cookies.
Enjoying Your Homemade Spritz

Conclusion:
So there you have it! This isn’t just another recipe; it’s an experience waiting to happen. I truly believe this recipe is a must-try because it delivers incredible flavor with surprisingly little effort. The combination of [mention key ingredients from the recipe, e.g., bright citrus notes, warm spices, and a satisfyingly chewy texture] creates a symphony of sensations that will leave you wanting more. Forget complicated techniques and hours in the kitchen this recipe is all about maximizing taste with minimal fuss. It’s perfect for busy weeknights, impromptu gatherings, or simply when you crave something truly special.
But the real magic lies in its versatility. While I’ve presented my favorite version, feel free to experiment and make it your own! For a delightful twist, try adding [mention a variation, e.g., a handful of chopped nuts or dried cranberries] for added texture and flavor. If you’re feeling adventurous, consider incorporating [mention another variation, e.g., a pinch of chili flakes] for a subtle kick. And for those with dietary restrictions, [mention a substitution, e.g., almond flour can easily replace all-purpose flour] without compromising the overall taste and texture.
Serving suggestions? The possibilities are endless! This dish pairs beautifully with [mention a side dish, e.g., a simple green salad] for a light and refreshing meal. It’s also fantastic as a side dish to [mention another pairing, e.g., grilled chicken or fish]. And if you’re looking for a truly decadent experience, try serving it with [mention a dessert pairing, e.g., a scoop of vanilla ice cream or a dollop of whipped cream]. Honestly, you can’t go wrong!
I know that the term spritz supervised injection might sound a little unusual in the context of a recipe, but trust me, the results are anything but! Think of it as a clever way to ensure even distribution of flavor and moisture, resulting in a truly exceptional final product. It’s a technique that elevates this recipe from ordinary to extraordinary, and I’m confident that you’ll be amazed by the difference it makes.
I’m so excited for you to try this recipe and discover its deliciousness for yourself. Don’t be afraid to get creative and put your own spin on it. After all, cooking is all about experimentation and having fun!
And now for the most important part: I want to hear about your experience! Did you love it as much as I do? Did you make any interesting variations? What did you serve it with? Share your photos, comments, and feedback in the comments section below. Your insights are invaluable and help me to continue creating recipes that you’ll love. Let’s build a community of passionate cooks who are eager to share their culinary adventures! So go ahead, give this recipe a try, and let me know what you think. Happy cooking! I can’t wait to hear from you!
Spritz Supervised Injection: A Comprehensive Guide
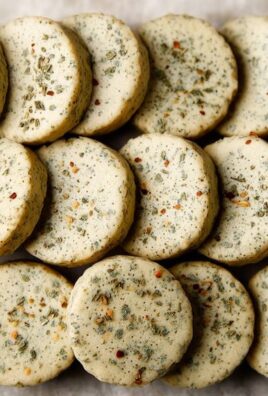
Crispy, buttery cookies with a hint of citrus, perfect for dipping in chocolate or enjoying on their own.
Ingredients
- 250g all-purpose flour
- 1 tsp baking powder
- 1/2 tsp baking soda
- 1/4 tsp salt
- 200g granulated sugar
- 1 large egg
- 120ml buttermilk
- 60ml vegetable oil
- 1 tsp vanilla extract
- 120ml boiling water
- 30g unsweetened cocoa powder
Instructions
Notes
- No notes found in the provided recipe.

Leave a Comment