
Fresh Apple Cake, warm from the oven, is a slice of pure autumnal bliss. Imagine sinking your teeth into a moist, tender cake, bursting with the sweet-tart flavor of juicy apples and a hint of cinnamon spice. It’s the kind of dessert that evokes memories of cozy kitchens, crackling fireplaces, and the comforting aroma of home baking. Have I got your attention? Good, because this recipe is about to become your new fall favorite!
Apple cake, in its various forms, has been a beloved dessert for centuries, with variations found across numerous cultures. From the simple apple cakes of early American settlers to the sophisticated apple tarts of Europe, this dessert has always been a way to celebrate the bounty of the apple harvest. It’s a testament to the enduring appeal of simple, wholesome ingredients transformed into something truly special.
What makes fresh apple cake so irresistible? It’s the perfect combination of textures and flavors. The moist, dense cake provides a comforting base, while the tender apples add a burst of juicy sweetness. The warm spices, like cinnamon and nutmeg, create a cozy, inviting aroma that fills your kitchen and warms your soul. Plus, it’s incredibly easy to make! This recipe requires no fancy equipment or complicated techniques, making it the perfect dessert for both novice and experienced bakers alike. Get ready to experience the joy of baking and sharing this delightful treat!

Ingredients:
- For the Shortbread Crust:
- 1 ½ cups (180g) all-purpose flour
- ½ cup (113g) unsalted butter, cold and cubed
- ? cup (67g) granulated sugar
- ¼ teaspoon salt
- 2 tablespoons ice water, or more as needed
- For the Cream Cheese Filling:
- 8 ounces (227g) cream cheese, softened
- ½ cup (113g) unsalted butter, softened
- 1 cup (120g) powdered sugar
- 1 teaspoon vanilla extract
- Pinch of salt
- For the Strawberry Topping:
- 2 pounds (900g) fresh strawberries, hulled and sliced
- ¼ cup (50g) granulated sugar
- 2 tablespoons lemon juice
- 1 tablespoon cornstarch
- Optional Garnish:
- Fresh mint leaves
- Whipped cream
Making the Shortbread Crust
- Combine Dry Ingredients: In a large bowl, whisk together the flour, sugar, and salt. This ensures that the salt is evenly distributed throughout the flour, which is crucial for flavor.
- Cut in the Butter: Add the cold, cubed butter to the flour mixture. Using a pastry blender or your fingertips, cut the butter into the flour until the mixture resembles coarse crumbs. The key here is to work quickly so the butter doesn’t melt. Small pieces of butter create flaky layers in the crust. If you don’t have a pastry blender, you can use two knives to cut the butter in.
- Add Ice Water: Gradually add the ice water, one tablespoon at a time, mixing until the dough just comes together. Be careful not to overmix, as this will develop the gluten in the flour and result in a tough crust. The dough should be slightly crumbly but hold together when pressed. If the dough is too dry, add another teaspoon of ice water at a time until it reaches the right consistency.
- Form the Dough: Gently gather the dough into a ball. Flatten it into a disc, wrap it in plastic wrap, and refrigerate for at least 30 minutes. This chilling period allows the gluten to relax, making the dough easier to roll out and preventing it from shrinking during baking.
- Roll Out the Dough: Preheat your oven to 350°F (175°C). On a lightly floured surface, roll out the dough to a 12-inch circle. The thickness should be about ¼ inch. If the dough is sticking, add a little more flour to the surface.
- Transfer to Pan: Carefully transfer the dough to a 9-inch tart pan with a removable bottom. Gently press the dough into the bottom and up the sides of the pan. Trim any excess dough from the edges. You can use a rolling pin to roll over the top of the pan to trim the edges neatly.
- Dock the Crust: Prick the bottom of the crust all over with a fork. This prevents the crust from puffing up during baking.
- Bake the Crust: Bake for 20-25 minutes, or until the crust is lightly golden brown. Keep a close eye on it, as baking times can vary depending on your oven. If the edges are browning too quickly, you can cover them with foil.
- Cool Completely: Let the crust cool completely in the pan before adding the filling. This is important to prevent the filling from melting.
Preparing the Cream Cheese Filling
- Cream Butter and Cream Cheese: In a large bowl, beat the softened cream cheese and butter together with an electric mixer until smooth and creamy. Make sure both the cream cheese and butter are at room temperature to avoid lumps in the filling.
- Add Powdered Sugar: Gradually add the powdered sugar, beating until light and fluffy. Start with a low speed to prevent the powdered sugar from flying everywhere.
- Add Vanilla and Salt: Stir in the vanilla extract and salt. The vanilla enhances the sweetness of the filling, and the salt balances the flavors.
- Spread Filling: Spread the cream cheese filling evenly over the cooled shortbread crust. Use an offset spatula or the back of a spoon to create a smooth surface.
- Chill: Cover the tart and refrigerate for at least 30 minutes to allow the filling to set. This will make it easier to slice and serve.
Making the Strawberry Topping
- Prepare Strawberries: Hull and slice the strawberries. Place them in a large bowl.
- Combine with Sugar and Lemon Juice: Add the granulated sugar and lemon juice to the strawberries. Gently toss to combine. The sugar will draw out the juices from the strawberries, creating a delicious syrup. The lemon juice adds brightness and prevents the strawberries from becoming too sweet.
- Let Macerate: Let the strawberries macerate for at least 15 minutes, or up to an hour, at room temperature. This allows the flavors to meld together and the strawberries to soften slightly.
- Strain the Juices: Strain the strawberry mixture, reserving the juices in a small saucepan. This step is crucial for creating a glossy and thickened sauce.
- Thicken the Sauce: In a small bowl, whisk together the cornstarch and 2 tablespoons of cold water to create a slurry. This prevents lumps from forming when you add it to the hot juice.
- Cook the Sauce: Bring the reserved strawberry juice to a simmer over medium heat. Gradually whisk in the cornstarch slurry and cook, stirring constantly, until the sauce thickens and becomes clear. This should only take a minute or two. Be careful not to overcook the sauce, as it will become too thick.
- Cool the Sauce: Remove the sauce from the heat and let it cool slightly.
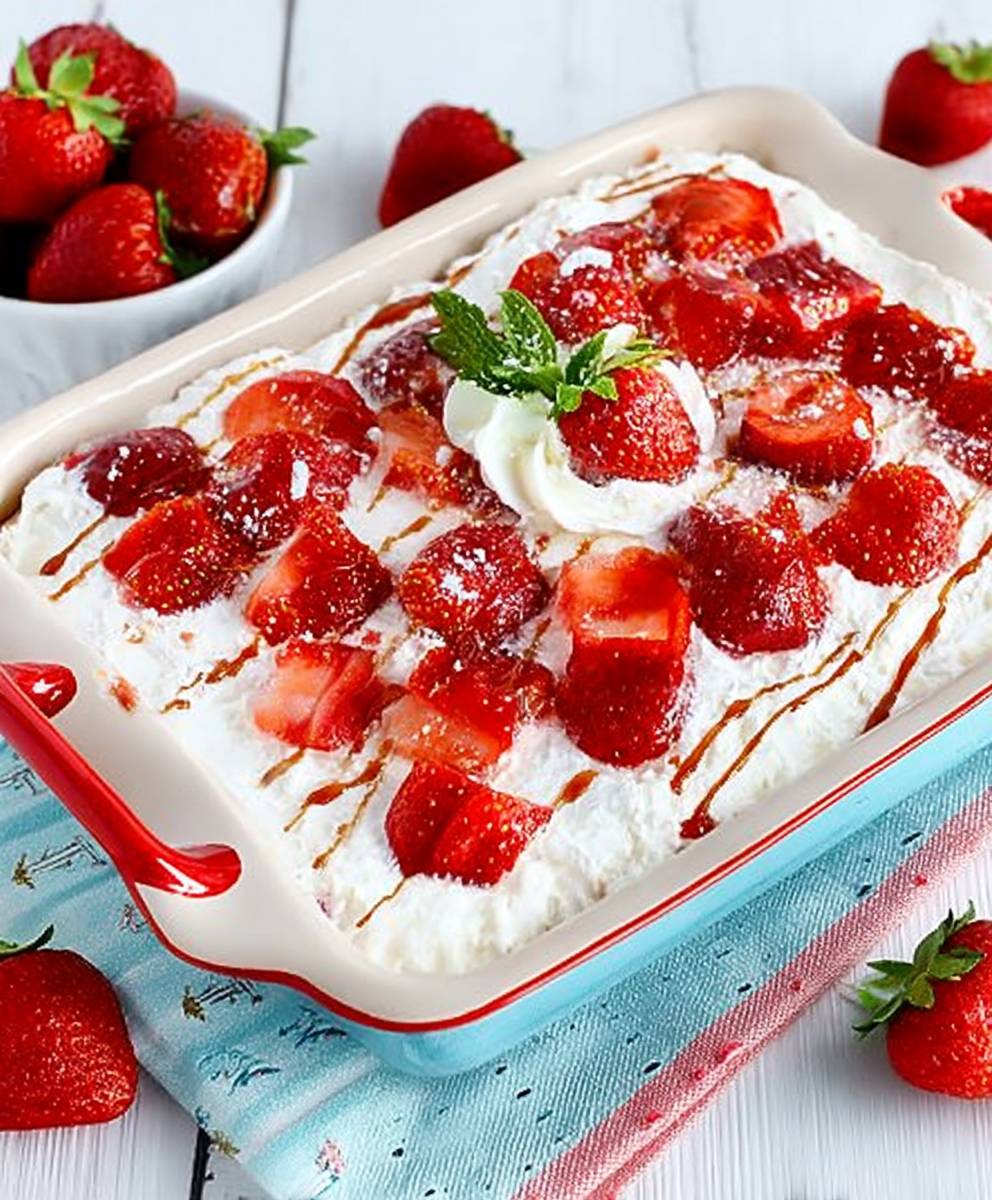
- Assemble the Tart: Arrange the sliced strawberries over the cream cheese filling. Pour the cooled strawberry sauce over the strawberries, ensuring they are evenly coated. The sauce will add shine and enhance the flavor of the strawberries.
- Chill Again: Refrigerate the tart for at least 30 minutes before serving. This allows the sauce to set and the flavors to meld together even further.
Serving and Storage
- Garnish (Optional): Before serving, garnish the tart with fresh mint leaves or a dollop of whipped cream.
- Slice and Serve: Use a sharp knife to slice the tart into wedges. The removable bottom of the tart pan makes it easy to remove the tart and slice it on a serving platter.
- Storage: Store any leftover tart in the refrigerator for up to 3 days. Cover it tightly with plastic wrap to prevent it from drying out. The crust may soften slightly over time, but the tart will still be delicious.
Tips for Success
- Use Cold Butter: Cold butter is essential for creating a flaky shortbread crust. Make sure the butter is very cold before you start. You can even freeze it for 15 minutes before using it.
- Don’t Overmix the Dough: Overmixing the dough will develop the gluten in the flour, resulting in a tough crust. Mix the dough just until it comes together.
- Chill the Dough: Chilling the dough allows the gluten to relax and prevents the crust from shrinking during baking.
- Use Softened Cream Cheese and Butter: Softened cream cheese and butter are essential for creating a smooth and creamy filling. Make sure both are at room temperature before you start.
- Don’t Overcook the Sauce: Overcooking the strawberry sauce will make it too thick. Cook it just until it thickens and becomes clear.
- Adjust Sweetness to Taste: Adjust the amount of sugar in the strawberry topping to your liking. If your strawberries are very sweet, you may need to use less sugar.
Variations
- Other Berries: You can substitute other berries for the strawberries, such as raspberries, blueberries, or blackberries.
- Chocolate Crust: For a chocolate crust, add ¼ cup of cocoa powder to the dry ingredients for the shortbread crust.
- Lemon Filling: For a lemon filling, substitute lemon zest and juice for the vanilla extract in the cream cheese filling.
- Almond Extract: Add a few drops of almond extract to the cream cheese filling for a nutty flavor.
Conclusion:
So, there you have it! This isn’t just another dessert; it’s a celebration of summer, a burst of sunshine in every bite, and a guaranteed crowd-pleaser. I truly believe this strawberry dessert is a must-try for anyone who loves fresh, vibrant flavors and a touch of sweetness. It’s simple enough for a weeknight treat but elegant enough to serve at your next dinner party. The combination of the juicy strawberries, the creamy filling, and the buttery crust (or the light and airy sponge, depending on your chosen variation) is simply irresistible.
But why is this recipe so special? It’s the perfect balance of textures and tastes. The sweetness of the strawberries is perfectly complemented by the slight tang of the cream cheese, and the buttery base provides a satisfying crunch. Plus, it’s incredibly versatile! Feel free to experiment with different types of berries raspberries, blueberries, or even a mixed berry medley would work beautifully.
Looking for serving suggestions? This strawberry dessert is fantastic on its own, but you can also elevate it with a few simple additions. A dollop of whipped cream or a scoop of vanilla ice cream is always a welcome treat. For a more sophisticated touch, try drizzling a balsamic glaze over the top or adding a sprinkle of chopped pistachios for a bit of crunch and nutty flavor. You could even serve it with a side of fresh mint for a refreshing contrast.
And speaking of variations, don’t be afraid to get creative! If you’re not a fan of cream cheese, you can substitute it with mascarpone or even Greek yogurt for a lighter option. For a vegan version, use a plant-based cream cheese alternative and a vegan butter substitute in the crust. You can also adjust the sweetness to your liking by adding more or less sugar.
Another fun variation is to make individual strawberry parfaits instead of a large dessert. Simply layer the strawberries, cream filling, and crumbled crust in small glasses or jars. This is a great option for parties or for portion control. You could even add a layer of granola for extra crunch and fiber.
I’m so confident that you’ll love this recipe, and I can’t wait to hear what you think! Seriously, this strawberry dessert is one of my all-time favorites, and I make it all the time, especially when strawberries are in season. It’s always a hit, and I know it will be for you too.
So, go ahead and give it a try! I promise you won’t be disappointed. And please, don’t forget to share your experience with me. I’d love to see your creations and hear about any variations you come up with. You can leave a comment below, tag me on social media, or even send me an email. I’m always excited to connect with fellow food lovers and hear about their culinary adventures. Happy baking (or no-baking, depending on your chosen method)! I hope this becomes a staple in your dessert rotation, just like it is in mine. Enjoy!
Strawberry Dessert: Delicious Recipes for Every Occasion
A simple and delicious strawberry dessert, perfect for a quick treat or elegant ending to a meal. Fresh strawberries are combined with [add ingredients and preparation details here].
Ingredients
- 2 cups sliced strawberries
- 1/2 cup granulated sugar
- 1/4 cup balsamic vinegar
- 1 cup heavy cream
- 1/4 cup powdered sugar
- 1 teaspoon vanilla extract
- Shortbread cookies, for serving
Instructions
- Preheat your oven to 350 degrees F (175 degrees C).
- In a large bowl, combine the flour, sugar, baking powder, and salt.
- Cut in the butter until the mixture resembles coarse crumbs.
- Stir in the milk until just moistened.
- Drop by rounded tablespoons onto an ungreased baking sheet.
- Bake for 15 to 20 minutes, or until golden brown.
- While the shortcakes are baking, prepare the strawberries.
- In a bowl, combine the sliced strawberries and sugar.
- Let stand for at least 15 minutes to allow the juices to release.
- To serve, split the shortcakes and top with the sweetened strawberries and whipped cream.
Notes
- Adjust sweetness to your liking.
- For a richer flavor, use full-fat cream cheese.
- Berries can be macerated for a deeper flavor.

Leave a Comment