
Oven baked chicken and rice: is there anything more comforting and satisfying? I don’t think so! Imagine tender, juicy chicken nestled amongst fluffy, flavorful rice, all cooked to perfection in a single pan. This isn’t just a meal; it’s a warm hug on a plate, a culinary classic that has graced family tables for generations.
The beauty of oven baked chicken and rice lies in its simplicity and versatility. While its exact origins are difficult to pinpoint, similar one-pot rice and meat dishes have been staples in various cultures for centuries. From the paella of Spain to the pilafs of the Middle East, the concept of combining grains and protein in a single cooking vessel is a time-honored tradition. This particular iteration, however, has become a beloved American comfort food, often associated with home-cooked meals and cherished family recipes.
But why do people adore this dish so much? It’s a symphony of textures and flavors! The chicken, infused with savory herbs and spices, offers a delightful contrast to the soft, slightly chewy rice. The ease of preparation is another major draw. Simply toss everything into a baking dish, pop it in the oven, and let the magic happen. No complicated techniques or endless pots and pans required! Plus, it’s a fantastic way to feed a crowd or enjoy delicious leftovers the next day. Get ready to experience the ultimate in comfort food you won’t be disappointed!

Ingredients:
- For the Cookie Dough:
- 1 cup (2 sticks) unsalted butter, softened
- 1 ½ cups granulated sugar
- 2 large eggs
- 1 teaspoon vanilla extract
- ½ teaspoon almond extract
- 3 cups all-purpose flour
- 1 teaspoon baking powder
- ½ teaspoon baking soda
- ¼ teaspoon salt
- For the Strawberry Filling:
- 1 cup freeze-dried strawberries, finely ground into a powder
- ½ cup (1 stick) unsalted butter, softened
- 3 cups powdered sugar
- 2-4 tablespoons milk (or heavy cream, for extra richness)
- ½ teaspoon vanilla extract
- Pinch of salt
- Optional: Red food coloring (gel or liquid), for a more vibrant color
- For Decoration (Optional):
- Melted white chocolate
- Sprinkles
- Additional freeze-dried strawberry powder
Making the Cookie Dough:
- Cream the Butter and Sugar: In a large bowl, or the bowl of your stand mixer, cream together the softened butter and granulated sugar until light and fluffy. This usually takes about 3-5 minutes. Don’t rush this step! Properly creaming the butter and sugar is essential for a tender cookie. You want the mixture to be pale and almost airy. Scrape down the sides of the bowl occasionally to ensure everything is evenly incorporated.
- Add the Eggs and Extracts: Beat in the eggs one at a time, mixing well after each addition. Then, stir in the vanilla extract and almond extract. The almond extract is optional, but I find it really complements the strawberry flavor in the filling. Be careful not to overmix at this stage, as overmixing can lead to tough cookies.
- Combine Dry Ingredients: In a separate medium bowl, whisk together the all-purpose flour, baking powder, baking soda, and salt. Whisking ensures that the baking powder and baking soda are evenly distributed throughout the flour, which is crucial for proper leavening.
- Gradually Add Dry Ingredients to Wet Ingredients: Gradually add the dry ingredients to the wet ingredients, mixing on low speed until just combined. Be careful not to overmix! Overmixing develops the gluten in the flour, which can result in tough cookies. Mix until the flour is almost completely incorporated, then stop and scrape down the sides of the bowl. Give it one or two more quick pulses until everything is just combined. A few streaks of flour are okay at this point.
- Chill the Dough: Wrap the cookie dough in plastic wrap and chill in the refrigerator for at least 30 minutes, or up to 2 hours. Chilling the dough prevents the cookies from spreading too much during baking and also allows the flavors to meld together. If you chill the dough for longer than 2 hours, you may need to let it sit at room temperature for a few minutes before scooping.
Preparing the Strawberry Filling:
- Grind the Freeze-Dried Strawberries: If you haven’t already, grind the freeze-dried strawberries into a fine powder using a food processor or blender. You can also use a resealable bag and a rolling pin to crush them. The finer the powder, the smoother your filling will be.
- Cream the Butter and Powdered Sugar: In a large bowl, or the bowl of your stand mixer, cream together the softened butter and powdered sugar until light and fluffy. This will take a few minutes, and you may need to scrape down the sides of the bowl a few times.
- Add Strawberry Powder and Vanilla Extract: Add the ground freeze-dried strawberry powder, vanilla extract, and a pinch of salt to the butter and powdered sugar mixture. Mix until well combined. The mixture will likely be quite dry at this point.
- Add Milk (or Heavy Cream): Gradually add the milk (or heavy cream), one tablespoon at a time, until the filling reaches a smooth and spreadable consistency. You may need more or less than 2-4 tablespoons, depending on the humidity and the consistency of your powdered sugar. Be careful not to add too much liquid, or the filling will be too thin.
- Adjust Color (Optional): If you want a more vibrant pink color, add a drop or two of red food coloring (gel or liquid) to the filling and mix until evenly distributed.
Baking and Assembling the Cookies:
- Preheat Oven and Prepare Baking Sheets: Preheat your oven to 375°F (190°C). Line baking sheets with parchment paper or silicone baking mats. This will prevent the cookies from sticking and make cleanup easier.
- Scoop and Bake the Cookies: Scoop the chilled cookie dough into rounded tablespoons and place them on the prepared baking sheets, leaving about 2 inches between each cookie. Bake for 8-10 minutes, or until the edges are lightly golden brown. The centers of the cookies will still appear slightly soft, but they will continue to set as they cool.
- Cool the Cookies: Let the cookies cool on the baking sheets for a few minutes before transferring them to a wire rack to cool completely. This prevents them from breaking.
- Assemble the Cookies: Once the cookies are completely cool, spread a generous amount of strawberry filling on the bottom of one cookie and top with another cookie, creating a sandwich. Gently press the cookies together to help the filling adhere.
- Decorate (Optional): If desired, melt white chocolate according to package directions. Dip the assembled cookies halfway into the melted white chocolate and then sprinkle with sprinkles or additional freeze-dried strawberry powder. You can also drizzle the melted white chocolate over the cookies. Let the white chocolate set completely before serving.
Tips for Success:
- Use Room Temperature Ingredients: Using room temperature butter and eggs is crucial for creating a smooth and well-emulsified cookie dough. This helps the cookies bake evenly and prevents them from being tough.
- Don’t Overmix the Dough: Overmixing the dough develops the gluten in the flour, which can result in tough cookies. Mix until the flour is just combined.
- Chill the Dough: Chilling the dough prevents the cookies from spreading too much during baking and also allows the flavors to meld together.
- Grind Freeze-Dried Strawberries Finely: Grinding the freeze-dried strawberries into a fine powder will ensure a smooth and creamy filling.
- Adjust Filling Consistency: Add milk (or heavy cream) to the filling gradually, one tablespoon at a time, until it reaches a smooth and spreadable consistency.
- Don’t Overbake: Overbaking the cookies will make them dry and crumbly. Bake until the edges are lightly golden brown and the centers are still slightly soft.
- Cool Completely Before Assembling: Make sure the cookies are completely cool before assembling them with the filling. This will prevent the filling from melting and making the cookies soggy.
Storage Instructions:
Store the assembled Strawberry Kiss Cookies in an airtight container at room temperature for up to 3 days, or in the refrigerator for up to 5 days. If storing in the refrigerator, let them come to room temperature before serving for the best flavor and texture.
Variations:
- Chocolate Strawberry Kiss Cookies: Add ¼ cup of unsweetened cocoa powder to the cookie dough for a chocolatey twist.
- Lemon Strawberry Kiss Cookies: Add 1 tablespoon of lemon zest to the cookie dough and 1 teaspoon of lemon juice to the strawberry filling for a bright and citrusy flavor.
- Nutella Strawberry Kiss Cookies: Spread a thin layer of Nutella on the bottom cookie before adding the strawberry filling for a decadent treat.
- Different Berry Filling: Substitute the freeze-dried strawberries with other freeze-dried berries, such as raspberries or blueberries, for a different flavor profile.
Troubleshooting:
- Cookies Spreading Too Much: If your cookies are spreading too much during baking, make sure your oven is at the correct temperature and that you are using the correct amount of flour. You may also need to chill the dough for a longer period of time.
- Cookies Too Dry: If your cookies are too dry, make sure you are not overbaking them. You may also need to add a little more butter or shortening to the dough.
- Filling Too Thin: If your filling is too thin, add a little more powdered sugar until it reaches the desired consistency.
- Filling Too Thick: If your filling is too thick, add a little more milk (or heavy cream) until it reaches the desired consistency.

Conclusion:
So, there you have it! These Strawberry Kiss Cookies are more than just a sweet treat; they’re a little burst of sunshine, a nostalgic nod to simpler times, and a guaranteed crowd-pleaser. I truly believe this recipe is a must-try for anyone who loves baking, enjoys a touch of fruity sweetness, or simply wants to create something special to share with loved ones. The combination of the buttery, melt-in-your-mouth cookie base with the bright, tangy strawberry kiss is simply irresistible. It’s a symphony of flavors and textures that will leave you wanting more.
But what truly elevates these cookies is their versatility. While the recipe as written is absolutely divine, feel free to experiment and make them your own! For a richer, more decadent experience, try using dark chocolate kisses instead of the strawberry ones. The bitterness of the dark chocolate will perfectly complement the sweetness of the cookie. Or, if you’re feeling adventurous, consider adding a pinch of sea salt to the dough to enhance the flavors and create a delightful sweet-and-salty contrast. You could even incorporate some finely chopped freeze-dried strawberries into the dough for an extra intense strawberry flavor!
Serving suggestions are endless! These Strawberry Kiss Cookies are perfect on their own with a glass of cold milk or a cup of hot coffee. They also make a wonderful addition to a dessert platter, a delightful treat to pack in lunchboxes, or a thoughtful homemade gift for friends and family. Imagine presenting a beautifully wrapped box of these cookies the smiles would be priceless! For a truly special occasion, consider using them as part of a cookie decorating party. Let everyone unleash their creativity with frosting, sprinkles, and other edible decorations. It’s a fun and engaging activity for all ages.
And don’t forget about ice cream! A warm Strawberry Kiss Cookie crumbled over a scoop of vanilla ice cream is pure bliss. Or, you could even make ice cream sandwiches using these cookies as the base. The possibilities are truly endless! I’ve even seen people use them as a crust for mini cheesecakes talk about a showstopper!
I’ve poured my heart and soul into perfecting this recipe, and I’m confident that you’ll love it as much as I do. The instructions are clear and easy to follow, even for beginner bakers. And the results? Absolutely worth the effort. So, gather your ingredients, preheat your oven, and get ready to embark on a baking adventure. I promise you won’t be disappointed. This Strawberry Kiss Cookie recipe is a keeper!
Now, it’s your turn! I’m so excited for you to try this recipe and experience the joy of baking these delightful cookies. Once you’ve made them, please, please, please share your experience with me! Let me know what you think, what variations you tried, and how much everyone loved them. You can leave a comment below, tag me on social media, or even send me an email. I truly value your feedback and love seeing your creations. Happy baking!
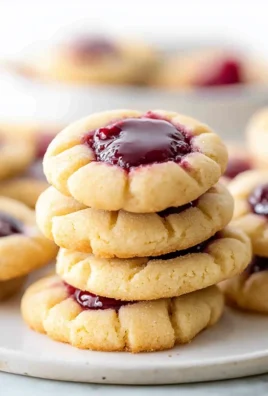
Strawberry Kiss Cookies: The Ultimate Recipe and Baking Guide
Soft, buttery cookies topped with a chocolate kiss and a burst of strawberry flavor. Perfect for holidays or any sweet occasion!
Ingredients
1 cup (2 sticks) unsalted butter, softened
1 cup granulated sugar
1/2 cup powdered sugar
1 teaspoon vanilla extract
1/2 teaspoon almond extract
2 1/4 cups all-purpose flour
1/2 teaspoon baking soda
1/4 teaspoon salt
1 cup strawberry jam or preserves
Pink food coloring (optional)
- 1 cup (2 sticks) unsalted butter, softened
- 1 cup granulated sugar
- 1/2 cup powdered sugar
- 1 teaspoon vanilla extract
- 1/2 teaspoon almond extract
- 2 1/4 cups all-purpose flour
- 1/2 teaspoon baking soda
- 1/4 teaspoon salt
- 1 cup strawberry jam or preserves
- Pink food coloring (optional)
Instructions
- Preheat oven to 375 degrees F (190 degrees C).
- In a medium bowl, cream together the butter, sugar, and brown sugar until smooth. Beat in the egg and vanilla. Stir in the flour, baking soda, and salt. Drop by rounded teaspoonfuls onto ungreased cookie sheets.
- Bake for 8 to 10 minutes, or until edges are nicely browned. Remove from cookie sheets to cool on a wire rack.
- Place a strawberry flavored candy kiss on top of each cookie while still warm.
Notes
- Store in an airtight container at room temperature.
- Cookies can be frozen for up to 2 months.
- For a festive look, roll the edges of the cookies in sprinkles before baking.


Leave a Comment