
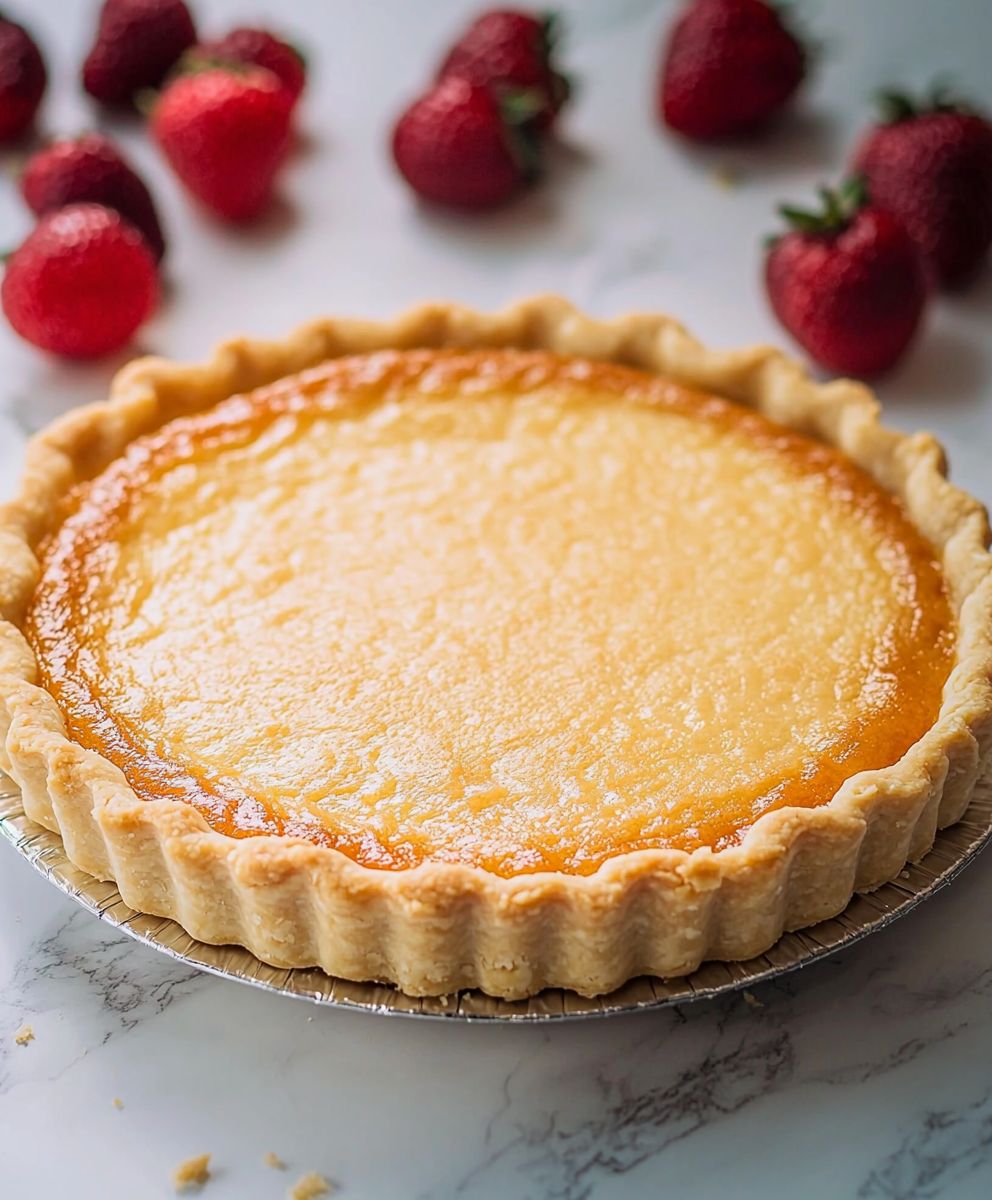
Sweet Tart Crust: the foundation of countless delectable desserts, and the key to unlocking pastry perfection! Have you ever bitten into a fruit tart, a chocolate ganache tart, or even a savory quiche and been utterly captivated by the buttery, crumbly, melt-in-your-mouth crust? That, my friends, is the magic of a well-made sweet tart crust, and I’m here to guide you through creating your own masterpiece.
While the exact origins are debated, the concept of a sweetened pastry crust dates back centuries, evolving from simple doughs used to encase meats and vegetables. Over time, sugar and butter were incorporated, transforming it into the delicate base we know and love today. In French patisseries, it’s known as pâte sucrée, a testament to its sweet nature and importance in classic desserts.
But what makes this crust so irresistible? It’s the perfect balance of sweet and savory, offering a delightful contrast to the fillings it cradles. The texture is equally important a tender, crumbly bite that practically dissolves in your mouth. Plus, a homemade sweet tart crust elevates any dessert, adding a touch of elegance and sophistication. It’s surprisingly versatile, too! Whether you’re a seasoned baker or just starting out, mastering this recipe will open up a world of possibilities. So, let’s get baking!

Ingredients:
- 1 1/4 cups (150g) all-purpose flour, plus more for dusting
- 1/2 cup (1 stick, 113g) unsalted butter, cold and cut into 1/2-inch cubes
- 1/4 cup (50g) granulated sugar
- 1/4 teaspoon salt
- 1 large egg yolk
- 2-4 tablespoons ice water
Preparing the Dough: The Foundation of a Perfect Tart
- Combine Dry Ingredients: In a large bowl, whisk together the flour, sugar, and salt. This ensures that the sugar and salt are evenly distributed throughout the flour, which is crucial for a consistent flavor and texture. I like to use a whisk for this step because it’s more effective at breaking up any clumps in the flour than a spoon.
- Incorporate the Butter: Add the cold, cubed butter to the flour mixture. Using a pastry blender or your fingertips, cut the butter into the flour until the mixture resembles coarse crumbs. The butter should be in small pieces, about the size of peas. This is the most important step for creating a flaky crust. The cold butter will create pockets of steam as it bakes, resulting in those desirable layers. If you’re using your fingertips, work quickly to prevent the butter from melting. You can also pulse the dry ingredients and butter in a food processor until the mixture resembles coarse crumbs.
- Add the Egg Yolk: In a small bowl, whisk the egg yolk with 2 tablespoons of ice water. The egg yolk adds richness and helps to bind the dough together. The ice water keeps the butter cold, which is essential for a flaky crust.
- Combine Wet and Dry Ingredients: Gradually add the egg yolk mixture to the flour and butter mixture, mixing until the dough just comes together. Be careful not to overmix. Overmixing will develop the gluten in the flour, resulting in a tough crust. If the dough seems too dry, add more ice water, 1 tablespoon at a time, until it comes together. The dough should be slightly moist but not sticky.
- Form the Dough into a Disc: Turn the dough out onto a lightly floured surface. Gently form it into a disc about 1 inch thick. This helps to ensure that the dough chills evenly.
- Chill the Dough: Wrap the dough tightly in plastic wrap and refrigerate for at least 1 hour, or preferably 2 hours. This allows the gluten to relax, which will make the dough easier to roll out and prevent it from shrinking during baking. You can also chill the dough overnight.
Rolling and Shaping the Dough: Getting Ready for the Oven
- Prepare Your Work Surface: Lightly flour a clean, flat surface. This will prevent the dough from sticking as you roll it out.
- Roll Out the Dough: Remove the dough from the refrigerator and let it sit at room temperature for about 5-10 minutes to soften slightly. This will make it easier to roll out. On the floured surface, roll out the dough into a circle about 12 inches in diameter and about 1/8 inch thick. The circle should be large enough to fit into your tart pan with some overhang.
- Transfer to Tart Pan: Gently transfer the rolled-out dough to a 9-inch tart pan with a removable bottom. You can do this by carefully folding the dough in half or quarters and then unfolding it into the pan. Alternatively, you can roll the dough around your rolling pin and then unroll it over the tart pan.
- Press the Dough into the Pan: Gently press the dough into the bottom and up the sides of the tart pan. Make sure the dough is evenly distributed and that there are no air pockets.
- Trim the Excess Dough: Use a rolling pin to roll over the top of the tart pan, trimming off the excess dough. Alternatively, you can use a sharp knife to trim the dough.
- Dock the Crust: Use a fork to prick the bottom of the crust all over. This will prevent the crust from puffing up during baking.
- Chill Again: Place the tart pan in the freezer for 15-20 minutes. This will help the crust to hold its shape during baking and prevent it from shrinking.
Baking the Tart Crust: Achieving Golden Perfection
- Preheat Oven: Preheat your oven to 375°F (190°C). Make sure your oven is properly preheated for even baking.
- Prepare for Blind Baking: Line the tart crust with parchment paper and fill it with pie weights or dried beans. This will prevent the crust from puffing up during baking. The weights provide even pressure and help maintain the crust’s shape.
- Blind Bake: Bake the crust for 20-25 minutes, or until the edges are lightly golden brown.
- Remove Weights: Carefully remove the parchment paper and pie weights.
- Continue Baking (if needed): If the bottom of the crust is still pale, bake for another 5-10 minutes, or until it is golden brown. Keep a close eye on it to prevent burning.
- Cool Completely: Let the tart crust cool completely in the pan before filling. This is important to prevent the filling from melting or becoming soggy.
Troubleshooting Tips for a Perfect Tart Crust
- Dough Too Dry: If the dough is too dry and crumbly, add more ice water, 1 tablespoon at a time, until it comes together. Be careful not to add too much water, as this will make the dough tough.
- Dough Too Sticky: If the dough is too sticky, add more flour, 1 tablespoon at a time, until it is easier to handle.
- Crust Shrinking: If the crust shrinks during baking, it may be because the dough was not chilled long enough or because it was overmixed. Make sure to chill the dough for at least 1 hour and avoid overmixing.
- Crust Puffing Up: If the crust puffs up during baking, make sure to dock it well with a fork and use pie weights or dried beans to weigh it down.
- Uneven Baking: If the crust is baking unevenly, rotate the tart pan halfway through baking.
- Burnt Edges: If the edges of the crust are browning too quickly, you can cover them with aluminum foil.
Variations and Serving Suggestions
- Flavor Variations: You can add different flavors to the tart crust by incorporating ingredients such as lemon zest, orange zest, vanilla extract, or almond extract.
- Sweet vs. Savory: While this recipe is for a sweet tart crust, you can easily adapt it for savory fillings by reducing the amount of sugar or omitting it altogether.
- Fillings: This tart crust is perfect for a variety of fillings, such as fruit tarts, chocolate tarts, lemon tarts, and quiches.
- Serving: Serve the tart chilled or at room temperature. You can garnish it with fresh fruit, whipped cream, or a dusting of powdered sugar.
Conclusion:
And there you have it! This sweet tart crust recipe isn’t just another recipe; it’s a gateway to a world of delectable desserts. I truly believe that mastering this crust will elevate your baking game to a whole new level. Why is it a must-try? Because it’s reliably flaky, perfectly sweet, and surprisingly easy to make once you get the hang of it. Forget store-bought crusts that taste like cardboard this homemade version is bursting with flavor and has that melt-in-your-mouth texture that everyone craves. Think of all the possibilities! Imagine filling this gorgeous crust with a creamy lemon curd, topping it with fresh berries and a dusting of powdered sugar. Or perhaps a rich chocolate ganache, sprinkled with sea salt for a delightful contrast. A classic apple tart with a lattice top? Absolutely! The beauty of this sweet tart crust is its versatility. It’s the perfect foundation for both sweet and slightly savory fillings. Beyond the classic fillings, don’t be afraid to experiment! How about a salted caramel tart? Or a pistachio cream filling? For a more rustic approach, try a frangipane filling with sliced pears or plums. And if you’re feeling adventurous, you could even use this crust for mini quiches or savory tarts with roasted vegetables and goat cheese. The possibilities are truly endless! Serving suggestions? Well, a slice of this tart is divine on its own, especially with a cup of freshly brewed coffee or tea. But you can also dress it up with a dollop of whipped cream, a scoop of vanilla ice cream, or a drizzle of chocolate sauce. For a more sophisticated presentation, try garnishing it with fresh herbs like mint or basil, or a sprinkle of edible flowers. Variations to consider: * Nutty Crust: Add a quarter cup of finely ground almonds or pecans to the flour mixture for a nutty flavor and texture. * Citrus Zest: Incorporate the zest of a lemon, orange, or lime for a bright and aromatic crust. * Spice It Up: Add a pinch of cinnamon, nutmeg, or cardamom for a warm and comforting flavor. * Chocolate Crust: Replace a few tablespoons of flour with cocoa powder for a rich chocolate crust. I’m so excited for you to try this recipe and experience the joy of baking your own perfect sweet tart crust. It might take a little practice to get it just right, but I promise you, it’s worth the effort. Don’t be discouraged if your first attempt isn’t perfect baking is all about learning and experimenting. So, go ahead, preheat your oven, gather your ingredients, and get ready to create something truly special. And most importantly, have fun! Baking should be a relaxing and enjoyable experience. Once you’ve made this recipe, I would absolutely love to hear about your experience. Did you try any variations? What fillings did you use? What did your friends and family think? Share your photos and stories in the comments below! I can’t wait to see what you create. Happy baking! Print
Sweet Tart Crust: The Ultimate Guide to Perfect Pastry
- Total Time: 45 minutes
- Yield: 1 9-inch tart crust 1x
Description
A buttery, crumbly, and slightly sweet pastry crust perfect for tarts and pies.
Ingredients
- 1 1/4 cups all-purpose flour
- 1/2 teaspoon salt
- 1/2 cup (1 stick) cold unsalted butter, cut into cubes
- 1/4 cup cold vegetable shortening, cut into cubes
- 3–5 tablespoons ice water
Instructions
“`html
- In a food processor, pulse together flour, sugar, and salt.
- Add butter and shortening and pulse until the mixture resembles coarse crumbs.
- With the processor running, gradually add ice water until the dough just comes together.
- Form the dough into a disc, wrap it in plastic wrap, and refrigerate for at least 30 minutes.
- On a lightly floured surface, roll out the dough to a 12-inch circle.
- Transfer the dough to a 9-inch tart pan with a removable bottom.
- Press the dough into the bottom and up the sides of the pan.
- Trim the excess dough and prick the bottom with a fork.
- Refrigerate for another 30 minutes.
- Preheat oven to 375°F (190°C).
- Line the tart shell with parchment paper and fill with pie weights or dried beans.
- Bake for 20 minutes.
- Remove the parchment paper and pie weights and bake for another 10-15 minutes, or until the crust is golden brown.
- Let cool completely before filling.
“`
Notes
- Use a food processor: This recipe comes together quickly and easily in a food processor.
- Use cold ingredients: Cold ingredients are key to a flaky crust.
- Don’t overmix: Overmixing will develop the gluten in the flour, resulting in a tough crust.
- Chill the dough: Chilling the dough allows the gluten to relax and prevents the crust from shrinking during baking.
- Blind bake: Blind baking ensures that the crust is fully cooked and prevents it from becoming soggy when filled.
- Prep Time: 10 minutes
- Cook Time: 20 minutes

Leave a Comment