
Raspberry frosé: the ultimate summer cooler that’s about to become your new go-to drink! Imagine yourself lounging by the pool, the sun warming your skin, and a frosty, vibrant pink concoction in your hand. Sounds idyllic, right? Well, with this recipe, that dream is just a blender away.
Frosé, a delightful blend of rosé wine and frozen fruit, has taken the world by storm in recent years, and for good reason. While its exact origins are debated, many credit its modern popularity to a New York City bar that first introduced it as a sophisticated, yet approachable, summer beverage. The beauty of frosé lies in its simplicity and adaptability. It’s not just a drink; it’s an experience. The combination of the light, fruity notes of rosé with the icy chill and sweetness of frozen fruit creates a symphony of flavors that dance on your palate.
People adore raspberry frosé because it’s incredibly refreshing, visually stunning, and surprisingly easy to make. The tartness of the raspberries perfectly complements the rosé, creating a balanced and utterly irresistible drink. Plus, it’s the perfect way to elevate any gathering, from casual backyard barbecues to elegant summer soirees. So, are you ready to ditch the ordinary and embrace the extraordinary? Let’s dive into this simple recipe and create a batch of raspberry frosé that will have everyone begging for more!

Ingredients:
- 4 large ripe bananas, peeled and sliced
- 1/4 cup plant-based milk (almond, soy, or oat milk work well)
- 1 teaspoon vanilla extract
- Optional toppings: chocolate chips, chopped nuts, shredded coconut, fresh berries
Freezing the Bananas:
This is the most crucial step, so let’s get it right! The bananas need to be properly frozen to achieve that creamy, ice cream-like texture. Trust me, it’s worth the wait!
- Peel and Slice: Start by peeling your bananas. Make sure they are nice and ripe the riper, the sweeter and creamier your ice cream will be. Look for bananas with plenty of brown spots. Slice them into roughly 1-inch thick pieces. This helps them freeze faster and more evenly.
- Arrange on a Tray: Line a baking sheet with parchment paper. This prevents the banana slices from sticking to the tray and each other. Spread the banana slices in a single layer on the prepared baking sheet. Make sure they aren’t touching, or they’ll freeze together in a big clump, which will make blending more difficult.
- Freeze Solid: Place the baking sheet in the freezer and freeze the banana slices for at least 2 hours, or preferably overnight. They need to be completely frozen solid. You should be able to tap them and hear a solid “thunk.” This is key to getting that perfect ice cream consistency.
Blending the Frozen Bananas:
Now for the fun part! This is where the magic happens and the frozen bananas transform into creamy, dreamy ice cream. Be patient and follow these steps carefully.
- Prepare Your Blender or Food Processor: You’ll need a high-speed blender or a powerful food processor for this recipe. A regular blender might struggle with the frozen bananas. If you’re using a food processor, make sure it’s fitted with the standard blade.
- Add Frozen Bananas: Remove the frozen banana slices from the freezer and add them to your blender or food processor. It’s best to add them in batches if your blender is smaller to avoid overloading it.
- Add Plant-Based Milk and Vanilla Extract: Pour in the plant-based milk and vanilla extract. The milk helps to loosen up the bananas and makes them easier to blend. The vanilla extract adds a lovely flavor, but you can experiment with other extracts like almond or maple.
- Blend Until Smooth: Start blending on low speed, gradually increasing to high speed. You’ll likely need to stop the blender several times to scrape down the sides with a spatula. The bananas will go through several stages: first, they’ll crumble, then they’ll form a thick paste, and finally, they’ll transform into a smooth, creamy mixture that resembles soft-serve ice cream. This process can take a few minutes, so be patient! Don’t add more liquid unless absolutely necessary, as too much liquid will make the ice cream watery. You want a thick, scoopable consistency.
- Check the Consistency: Once the mixture is smooth and creamy, check the consistency. If it’s too soft, you can transfer it to a freezer-safe container and freeze it for another 30 minutes to an hour to firm it up. If it’s too thick, add a tiny splash more plant-based milk and blend again.
Serving and Enjoying Your Vegan Banana Ice Cream:
The best part! Now it’s time to enjoy the fruits (or rather, bananas) of your labor. Get ready for a delicious and guilt-free treat!
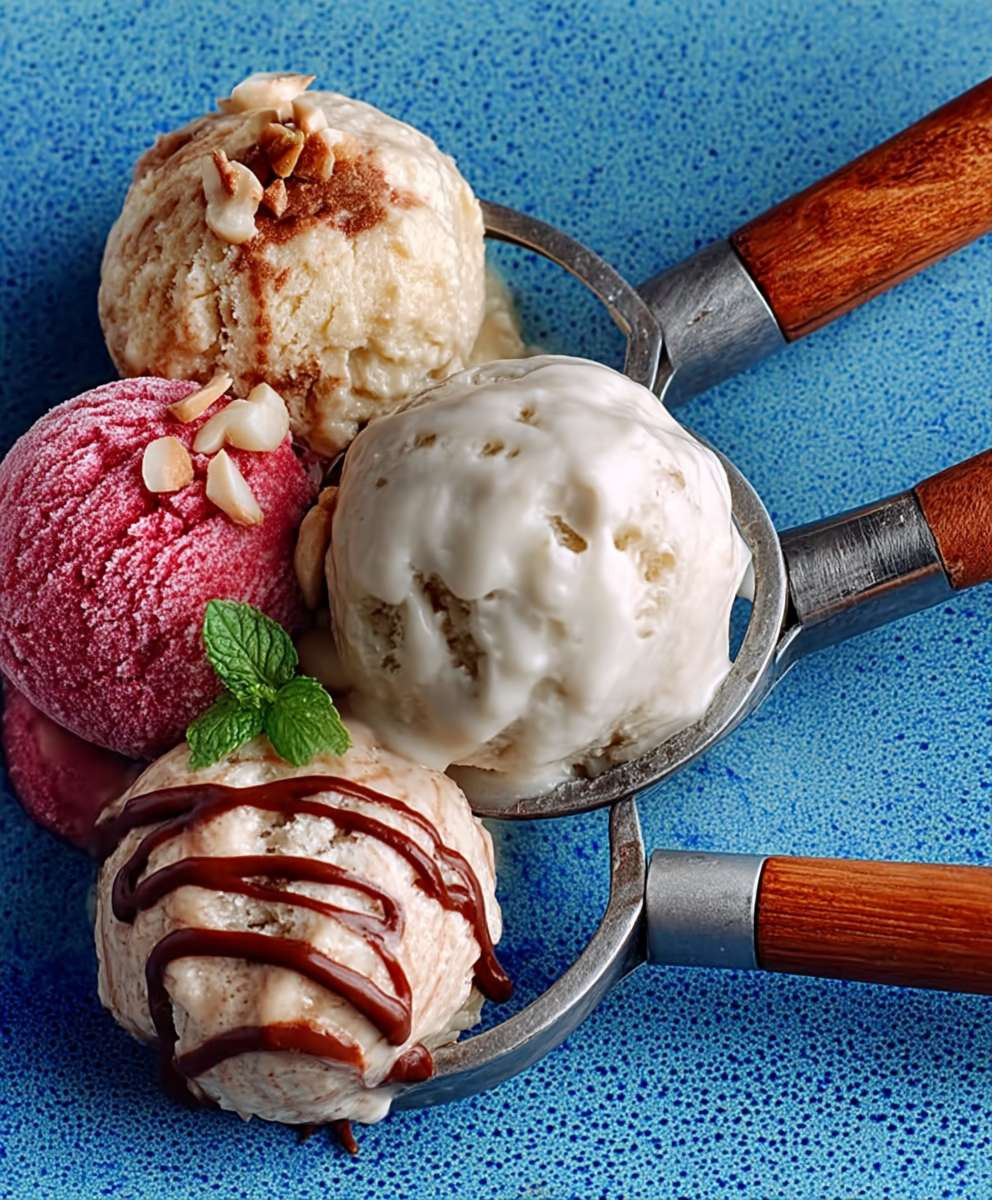
- Scoop and Serve: Scoop the banana ice cream into bowls or cones. It’s best served immediately for that soft-serve texture. If you’ve frozen it for longer, let it sit at room temperature for a few minutes to soften slightly before scooping.
- Add Toppings (Optional): This is where you can get creative! Add your favorite toppings to customize your ice cream. Some popular options include:
- Chocolate chips (dark chocolate is a great vegan option)
- Chopped nuts (walnuts, pecans, almonds, or peanuts)
- Shredded coconut
- Fresh berries (strawberries, blueberries, raspberries)
- A drizzle of maple syrup or agave nectar
- A sprinkle of cinnamon
- Enjoy Immediately: Vegan banana ice cream is best enjoyed immediately. It will melt quickly, so don’t wait too long!
Tips and Variations:
Want to take your vegan banana ice cream to the next level? Here are some tips and variations to try:
- Add Peanut Butter: For a peanut butter banana ice cream, add 1-2 tablespoons of peanut butter to the blender along with the frozen bananas and milk.
- Add Cocoa Powder: For chocolate banana ice cream, add 1-2 tablespoons of cocoa powder to the blender.
- Add Berries: For a berry-flavored ice cream, add a handful of frozen berries (strawberries, blueberries, raspberries) to the blender.
- Add Coffee: For coffee banana ice cream, add a teaspoon of instant coffee powder to the blender.
- Make it Chunky: After blending, stir in some chopped nuts, chocolate chips, or fruit for a chunky texture.
- Use Different Plant-Based Milks: Experiment with different plant-based milks to find your favorite flavor. Coconut milk will give the ice cream a richer, creamier texture.
- Sweeten it Up: If your bananas aren’t sweet enough, you can add a touch of maple syrup, agave nectar, or stevia to the blender.
- Storage: If you have leftover ice cream, store it in a freezer-safe container in the freezer. It will become quite hard, so let it thaw for a few minutes before scooping.
Troubleshooting:
Sometimes things don’t go exactly as planned. Here are some common issues and how to fix them:
- Ice Cream is Too Watery: This usually happens if you add too much liquid. Next time, use less plant-based milk. You can also try adding a tablespoon of cornstarch to the blender to thicken it up.
- Ice Cream is Too Hard: This usually happens if you freeze the ice cream for too long. Let it thaw at room temperature for a few minutes before scooping.
- Blender is Struggling: If your blender is struggling to blend the frozen bananas, try adding a little more plant-based milk, one tablespoon at a time. You can also try pulsing the blender instead of running it continuously. Make sure your bananas are frozen solid, but not rock hard.
- Ice Cream is Not Sweet Enough: If your bananas aren’t sweet enough, add a touch of maple syrup, agave nectar, or stevia to the blender. Riper bananas will always yield a sweeter result.
Nutritional Information (Approximate):
Please note that the nutritional information is an estimate and may vary depending on the specific ingredients used.
- Calories: Approximately 150-200 per serving
- Fat: 1-2 grams
- Protein: 2-3 grams
- Carbohydrates: 30-40 grams
- Fiber: 3-4 grams
This vegan banana ice cream is a healthy and delicious treat that you can enjoy guilt-free! It’s packed with potassium, fiber, and other essential nutrients. Plus, it’s naturally sweet and creamy, so you don’t need to add any refined sugar.
Why This Recipe Works:
The secret to this recipe is the frozen bananas. When frozen and blended, they create a naturally creamy and smooth texture that mimics traditional ice cream. The plant-based milk adds a touch of moisture and helps the bananas blend more easily. The vanilla extract enhances the flavor and adds a touch of sweetness. And the optional toppings allow you to customize your ice cream to your liking.
This recipe is also incredibly versatile. You can easily adapt it to suit your dietary needs and preferences. For example, you can use different plant-based milks, add different flavorings, or use different toppings. The possibilities are endless!
So, what are you waiting for? Grab some ripe bananas and get blending! You’ll be amazed at how easy it is to make delicious and healthy vegan banana ice cream at home.
Conclusion:
So, there you have it! This vegan banana ice cream recipe is truly a game-changer, and I genuinely believe it deserves a permanent spot in your dessert rotation. Why? Because it’s ridiculously easy, unbelievably healthy, and tastes absolutely divine. Forget those complicated ice cream recipes with endless ingredients and fussy steps. This one requires minimal effort and delivers maximum flavor. It’s the perfect solution for those late-night sweet cravings, a guilt-free treat for the kids, or a refreshing dessert to impress your guests.
But the best part? It’s completely customizable! I’ve given you the basic blueprint for creamy, dreamy banana ice cream, but the possibilities are truly endless. Feeling adventurous? Throw in a handful of frozen berries like raspberries or blueberries for a burst of fruity goodness. Craving something a little more decadent? Add a tablespoon or two of cocoa powder for a rich, chocolatey twist. A swirl of peanut butter or almond butter will add a nutty depth that’s simply irresistible. And for those who love a little crunch, chopped nuts, shredded coconut, or even a sprinkle of vegan chocolate chips are fantastic additions.
Serving suggestions are just as versatile. Enjoy it straight from the blender for a soft-serve consistency, or freeze it for a few hours for a firmer, scoopable treat. Top it with fresh fruit, a drizzle of maple syrup, or a sprinkle of cinnamon. You can even use it as a base for smoothies or milkshakes! Imagine blending this banana ice cream with some almond milk, spinach, and protein powder for a healthy and delicious post-workout recovery drink. Or, how about layering it with granola and berries for a stunning and satisfying parfait?
I’ve even experimented with adding a touch of vanilla extract or a pinch of sea salt to enhance the natural sweetness of the bananas. Don’t be afraid to get creative and experiment with different flavor combinations to find your perfect version of this vegan banana ice cream. The beauty of this recipe is its simplicity and adaptability. It’s a blank canvas just waiting for your personal touch.
Honestly, I can’t recommend this recipe enough. It’s a lifesaver on hot summer days, a comforting treat during the colder months, and a healthy alternative to traditional ice cream that you can feel good about eating. It’s also a fantastic way to use up those overripe bananas that are sitting on your counter. No more throwing them away! Now you can transform them into a delicious and nutritious dessert.
So, what are you waiting for? Grab those bananas, toss them in the freezer, and get ready to experience the magic of this incredible recipe. I promise you won’t be disappointed. And once you’ve tried it, I’d absolutely love to hear about your experience. Did you add any special ingredients? What were your favorite flavor combinations? Share your photos and stories in the comments below! I’m always eager to learn new ways to enjoy this amazing vegan banana ice cream. Happy blending! I am sure you will love it as much as I do.
Vegan Banana Ice Cream: The Easiest 3-Ingredient Recipe
Blend frozen bananas until smooth and creamy. Enjoy as is or add your favorite toppings.
Ingredients
- 3 frozen bananas, sliced
- 1/4 cup plant-based milk (such as almond, soy, or oat milk)
- Optional toppings: chocolate chips, nuts, shredded coconut, fruit
Instructions
- Peel the bananas and slice them into 1-inch thick pieces.
- Place the banana slices in a freezer-safe bag or container and freeze for at least 2 hours, or until solid.
- Once the bananas are frozen, transfer them to a food processor or high-speed blender.
- Blend until smooth and creamy, scraping down the sides as needed. This may take a few minutes.
- If desired, add any additional flavorings like vanilla extract, cocoa powder, or peanut butter. Blend until well combined.
- Serve immediately for a soft-serve consistency, or transfer to a freezer-safe container and freeze for another 30 minutes to an hour for a firmer texture.
Notes
- For a richer flavor, use very ripe bananas with brown spots.
- If you don’t have a high-speed blender, you may need to add a tablespoon or two of plant-based milk to help the bananas blend smoothly.
- Feel free to add other ingredients like cocoa powder, peanut butter, or berries for different flavor variations.
- The ice cream is best served immediately after blending, but can be stored in the freezer for later. If frozen solid, let it thaw for a few minutes before serving.

Leave a Comment