
Stuffed mini peppers are the ultimate crowd-pleaser, bursting with flavor in every colorful bite! Forget boring appetizers; these little gems are about to become the star of your next gathering. Imagine popping a sweet, slightly tangy mini pepper filled with a savory, cheesy, and perfectly seasoned mixture into your mouth. It’s an explosion of textures and tastes that will leave you craving more.
While the exact origins of stuffed peppers are debated, the concept of filling vegetables with delicious ingredients has been around for centuries across various cultures. From the Mediterranean to Eastern Europe, stuffed vegetables represent resourcefulness and culinary creativity. These stuffed mini peppers are a modern, bite-sized twist on a classic, making them perfect for parties, potlucks, or even a fun weeknight snack.
What makes these so irresistible? It’s the perfect combination of sweet and savory. The natural sweetness of the mini peppers complements the rich, often cheesy, filling beautifully. Plus, they’re incredibly convenient! They can be prepped ahead of time and baked just before serving, freeing you up to enjoy your guests. The vibrant colors also add a festive touch to any table. Get ready to impress with these delightful and easy-to-make appetizers!

Ingredients:
- For the Filling:
- 1 tablespoon vegetable oil
- 1 medium onion, finely chopped
- 2 cloves garlic, minced
- 1 inch ginger, grated
- 1 cup shredded cabbage (green or napa)
- 1 cup shredded carrots
- 1/2 cup sliced mushrooms (shiitake, cremini, or button)
- 1/2 cup bean sprouts
- 1/4 cup chopped scallions
- 2 tablespoons soy sauce
- 1 tablespoon rice vinegar
- 1 teaspoon sesame oil
- 1/2 teaspoon sugar
- 1/4 teaspoon white pepper
- Optional: 1/2 cup cooked glass noodles (soaked and chopped)
- For the Wrappers:
- 20-25 spring roll wrappers (rice paper or wheat-based)
- For Sealing and Frying:
- 1 tablespoon all-purpose flour
- 2 tablespoons water
- Vegetable oil for deep frying
- Optional Dipping Sauce:
- Soy sauce
- Rice vinegar
- Sesame oil
- Chili garlic sauce (or sriracha)
- Chopped scallions
Preparing the Filling:
Okay, let’s get started with the heart of our spring rolls the delicious filling! This is where you can really customize things to your liking, so feel free to adjust the vegetables based on what you have on hand.
- Sauté the Aromatics: Heat the vegetable oil in a large wok or skillet over medium heat. Add the chopped onion and cook until softened and translucent, about 3-5 minutes. Then, add the minced garlic and grated ginger and cook for another minute until fragrant. Be careful not to burn the garlic!
- Add the Vegetables: Add the shredded cabbage, carrots, and sliced mushrooms to the wok. Stir-fry for about 5-7 minutes, or until the vegetables are slightly softened but still have a bit of crunch. We don’t want them to be mushy!
- Incorporate the Remaining Ingredients: Add the bean sprouts, chopped scallions, soy sauce, rice vinegar, sesame oil, sugar, and white pepper to the wok. Stir-fry for another 2-3 minutes, ensuring everything is well combined. If you’re using glass noodles, add them now and mix them in thoroughly.
- Taste and Adjust: Give the filling a taste and adjust the seasonings as needed. You might want to add a little more soy sauce for saltiness, rice vinegar for tanginess, or sugar for sweetness. Remember, it’s all about your personal preference!
- Cool the Filling: Remove the wok from the heat and let the filling cool completely. This is important because if the filling is too hot, it will make the spring roll wrappers soggy and difficult to work with. You can spread the filling out on a baking sheet to help it cool faster.
Preparing the Spring Roll Wrappers:
Now, let’s get ready to wrap those delicious veggies! The type of wrapper you use will affect the final texture of your spring rolls. Rice paper wrappers will result in a lighter, crispier spring roll, while wheat-based wrappers will be a bit chewier.
- Prepare Your Workspace: Set up a clean, dry workspace. You’ll need a large plate or cutting board to work on. If you’re using rice paper wrappers, you’ll also need a shallow dish filled with warm water.
- Hydrate Rice Paper Wrappers (if using): If you’re using rice paper wrappers, dip one wrapper at a time into the warm water for a few seconds, until it becomes pliable but not too soft. Be careful not to over-soak them, as they will become sticky and difficult to handle. Place the softened wrapper on your work surface.
- Keep Wheat Wrappers Covered (if using): If you’re using wheat-based wrappers, keep them covered with a damp cloth to prevent them from drying out.
Assembling the Spring Rolls:
This is the fun part! Get ready to roll!
- Place the Filling: Place about 2-3 tablespoons of the cooled filling in the center of the wrapper. Don’t overfill the wrapper, or it will be difficult to seal.
- Fold the Sides: Fold the sides of the wrapper over the filling, tucking them in tightly.
- Roll Tightly: Starting from the edge closest to you, roll the wrapper tightly over the filling, like you’re rolling a burrito.
- Seal the Edge: To seal the edge, mix the flour and water together to create a slurry. Brush a small amount of the slurry onto the edge of the wrapper and continue rolling to seal it completely. This will help prevent the spring rolls from unraveling during frying.
- Repeat: Repeat steps 1-4 until all the filling and wrappers are used.
Frying the Spring Rolls:
Time to get that golden-brown crispiness we all crave!
- Heat the Oil: Pour enough vegetable oil into a deep fryer or large pot to reach a depth of about 2-3 inches. Heat the oil to 350°F (175°C). You can test the temperature of the oil by dropping a small piece of bread into it. If the bread turns golden brown in about 30 seconds, the oil is ready.
- Fry in Batches: Carefully place the spring rolls into the hot oil, making sure not to overcrowd the fryer. Fry in batches of 3-4 spring rolls at a time to maintain the oil temperature.
- Fry Until Golden Brown: Fry the spring rolls for about 3-5 minutes, or until they are golden brown and crispy on all sides. Turn them occasionally to ensure even cooking.
- Remove and Drain: Use a slotted spoon or tongs to remove the spring rolls from the oil and place them on a wire rack lined with paper towels to drain excess oil.
Serving and Enjoying:
The moment we’ve been waiting for! Time to dig in!
- Serve Immediately: Serve the spring rolls immediately while they are still hot and crispy.
- Prepare Dipping Sauce (Optional): While the spring rolls are frying, you can prepare a dipping sauce by combining soy sauce, rice vinegar, sesame oil, chili garlic sauce (or sriracha), and chopped scallions in a small bowl. Adjust the proportions to your liking.
- Enjoy! Dip the spring rolls in the dipping sauce and enjoy! These are perfect as an appetizer, snack, or even a light meal.
Tips and Variations:
Vegetable Variations:
Feel free to experiment with different vegetables in the filling. Some other great options include:
- Bell peppers
- Snow peas
- Broccoli florets
- Edamame
Protein Additions:
If you want to add some protein to your spring rolls, you can include:
- Cooked shrimp
- Shredded chicken
- Tofu (drained and crumbled)
Spicy Kick:
Add a pinch of red pepper flakes or a dash of chili oil to the filling for a spicy kick.
Baked Spring Rolls:
For a healthier alternative, you can bake the spring rolls instead of frying them. Preheat your oven to 400°F (200°C). Brush the spring rolls with a little bit of oil and bake for 15-20 minutes, or until they are golden brown and crispy, flipping them halfway through.
Make-Ahead Instructions:
You can assemble the spring rolls ahead of time and store them in the refrigerator for up to 24 hours. Cover them tightly with plastic wrap to prevent them from drying out. Fry or bake them just before serving.
Freezing Instructions:
To freeze spring rolls, place them on a baking sheet lined with parchment paper and freeze them for about 2-3 hours, or until they are solid. Then, transfer them to a freezer-safe bag or container and store them in the freezer for up to 2-3 months. When you’re ready to eat them, you can fry or bake them directly from frozen, adding a few extra minutes to the cooking time
Conclusion:
Alright, my friends, are you ready to roll? (Pun absolutely intended!). I truly believe this vegetable spring rolls recipe is a game-changer, and here’s why: it’s fresh, vibrant, incredibly versatile, and surprisingly easy to make. Forget those greasy, heavy spring rolls you might be used to; these are light, packed with nutrients, and bursting with flavor. Its a guaranteed crowd-pleaser, whether you’re serving them as an appetizer, a light lunch, or even a fun and interactive dinner party dish.
But beyond the deliciousness, this recipe is a must-try because it empowers you to get creative in the kitchen. You’re not just following instructions; you’re building a flavor profile that reflects your own tastes and preferences. Don’t be afraid to experiment with different vegetables, herbs, and dipping sauces. That’s where the real magic happens!
Serving Suggestions and Variations:
Need some inspiration? Here are a few ideas to get you started:
* Dipping Sauces: The classic peanut sauce is always a winner, but don’t stop there! Try a sweet chili sauce, a tangy hoisin sauce, or even a spicy sriracha mayo for an extra kick. For a lighter option, a simple soy sauce with a squeeze of lime juice works wonders.
* Protein Power: While this recipe is fantastic as is, you can easily add some protein to make it a more substantial meal. Grilled shrimp, shredded chicken, or even tofu would be delicious additions. Just make sure to cut them into thin strips so they fit nicely inside the rolls.
* Herb Heaven: Don’t underestimate the power of fresh herbs! Mint, cilantro, and Thai basil are all fantastic choices that will add a burst of freshness to your spring rolls. Experiment with different combinations to find your favorite.
* Spice It Up: If you like a little heat, add a pinch of red pepper flakes to your filling or mix some sriracha into your dipping sauce. A little goes a long way!
* Make it a Meal Prep Marvel: Prepare all the ingredients ahead of time chop the vegetables, cook any protein, and make your dipping sauce. Then, when you’re ready to eat, simply assemble the spring rolls. This is a great way to have a healthy and delicious meal ready in minutes.
* Dessert Spring Rolls?: Okay, hear me out! While we’re focused on savory, you could even adapt this concept for a dessert. Think sliced mango, strawberries, and a drizzle of honey, all wrapped in rice paper. A fun and unexpected treat!
I’m genuinely excited for you to try this recipe and discover the joy of making your own vegetable spring rolls. It’s a fun, healthy, and rewarding experience that I know you’ll love.
So, what are you waiting for? Gather your ingredients, roll up your sleeves, and get ready to create some culinary magic! And most importantly, don’t forget to share your creations with me! I’d love to see your variations, hear about your favorite dipping sauces, and learn about any tips or tricks you discover along the way. Tag me in your photos on social media, or leave a comment below. I can’t wait to hear about your spring roll adventures! Happy rolling!
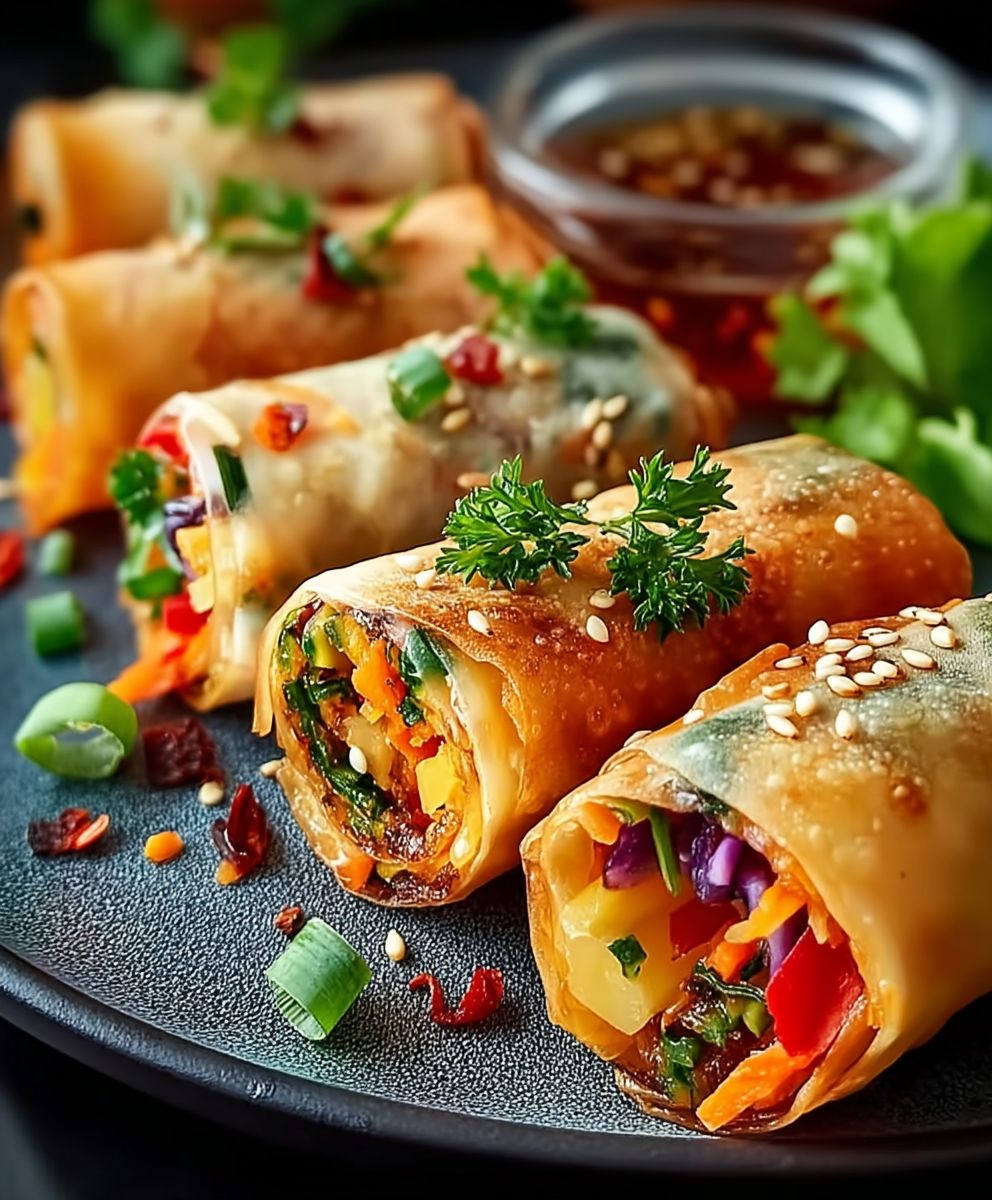
Vegetable Spring Rolls: A Delicious & Easy Recipe
Crispy, golden spring rolls filled with a savory mix of fresh vegetables. Perfect as an appetizer or light meal.
Ingredients
- 1 package spring roll wrappers
- 1 tablespoon vegetable oil
- 1 cup shredded cabbage
- 1 cup shredded carrots
- 1/2 cup sliced mushrooms
- 1/4 cup chopped green onions
- 2 tablespoons soy sauce
- 1 tablespoon sesame oil
- 1 teaspoon grated ginger
- 1 clove garlic, minced
Instructions
- Prepare the filling: In a large bowl, combine shredded cabbage, carrots, bell peppers, and bean sprouts.
- Add soy sauce, sesame oil, ginger, and garlic to the filling mixture. Mix well.
- Prepare the spring roll wrappers: Lay a spring roll wrapper on a flat surface.
- Place a spoonful of the vegetable filling in the center of the wrapper.
- Fold the sides of the wrapper inward, then tightly roll it up from the bottom.
- Seal the edge with a mixture of water and flour.
- Heat vegetable oil in a large skillet or deep fryer.
- Fry the spring rolls until golden brown and crispy.
- Remove the spring rolls from the oil and place them on a paper towel-lined plate to drain excess oil.
- Serve the vegetable spring rolls hot with your favorite dipping sauce.
Notes
- Adjust the amount of vegetables according to your preference.
- Serve immediately for the best crispy texture.
- These can be made ahead and frozen before frying. Fry from frozen, adding a few minutes to the cooking time.
- For a spicier kick, add a pinch of red pepper flakes to the vegetable mixture.
“`


Leave a Comment